本文对BlockCanary源码进行了分析。
《行宫》
寥落古行宫,宫花寂寞红。
白头宫女在,闲坐说玄宗。
—唐,元稹
原理(转自BlockCanary)
熟悉Message/Looper/Handler系列的同学们一定知道Looper.java中这么一段:1
2
3
4
5
6
7
8
9
10
11
12
13
14
15
16
17
18
19
20
21
22
23
24private static Looper sMainLooper; // guarded by Looper.class
...
/**
* Initialize the current thread as a looper, marking it as an
* application's main looper. The main looper for your application
* is created by the Android environment, so you should never need
* to call this function yourself. See also: {@link #prepare()}
*/
public static void prepareMainLooper() {
prepare(false);
synchronized (Looper.class) {
if (sMainLooper != null) {
throw new IllegalStateException("The main Looper has already been prepared.");
}
sMainLooper = myLooper();
}
}
/** Returns the application's main looper, which lives in the main thread of the application.
*/
public static Looper getMainLooper() {
synchronized (Looper.class) {
return sMainLooper;
}
}
即整个应用的主线程,只有这一个looper,不管有多少handler,最后都会回到这里。
如果再细心一点会发现在Looper的loop方法中有这么一段
1 | public static void loop() { |
是的,就是这个Printer - mLogging,它在每个message处理的前后被调用,而如果主线程卡住了,不就是在dispatchMessage里卡住了吗?
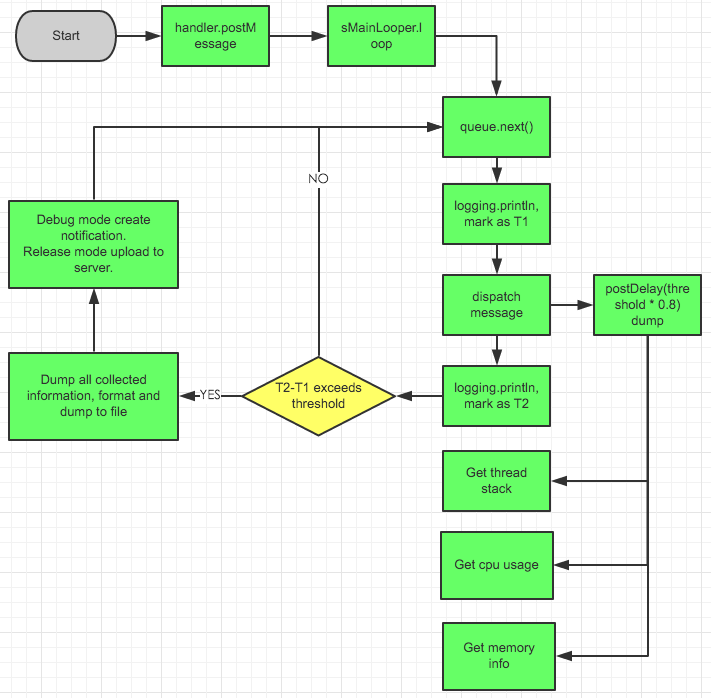
核心流程图:

该组件利用了主线程的消息队列处理机制,通过
1 | Looper.getMainLooper().setMessageLogging(mainLooperPrinter); |
并在mainLooperPrinter中判断start和end,来获取主线程dispatch该message的开始和结束时间,并判定该时间超过阈值(如2000毫秒)为主线程卡慢发生,并dump出各种信息,提供开发者分析性能瓶颈。
1 | @Override |
说到此处,想到是不是可以用mainLooperPrinter来做更多事情呢?既然主线程都在这里,那只要parse出app包名的第一行,每次打印出来,是不是就不需要打点也能记录出用户操作路径? 再者,比如想做onClick到页面创建后的耗时统计,是不是也能用这个原理呢? 之后可以试试看这个思路(目前存在问题是获取线程堆栈是定时3秒取一次的,很可能一些比较快的方法操作一下子完成了没法在stacktrace里面反映出来)。
源码解析
使用方法:1
BlockCanary.install(this, new AppBlockCanaryContext()).start();
从上面的入口先来看一下BlockCanary类,可以看到只是简单的初始化赋值等操作,start方法中给MainLooper设置了打印消息的监听,构造方法中判断如果需要显示通知会使用mBlockCanaryCore.addBlockInterceptor方法添加阻塞事件监听。
BlockCanary.java1
2
3
4
5
6
7
8
9
10
11
12
13
14
15
16
17
18
19
20
21
22
23
24
25
26
27
28
29
30
31
32
33
34
35
36
37
38
39
40
41
42
43
44
45
46
47
48
49
50
51private BlockCanaryInternals mBlockCanaryCore;
private BlockCanary() {
BlockCanaryInternals.setContext(BlockCanaryContext.get());
mBlockCanaryCore = BlockCanaryInternals.getInstance();
mBlockCanaryCore.addBlockInterceptor(BlockCanaryContext.get());
if (!BlockCanaryContext.get().displayNotification()) {
return;
}
mBlockCanaryCore.addBlockInterceptor(new DisplayService());
}
/**
* Install {@link BlockCanary}
*
* @param context Application context
* @param blockCanaryContext BlockCanary context
* @return {@link BlockCanary}
*/
public static BlockCanary install(Context context, BlockCanaryContext blockCanaryContext) {
BlockCanaryContext.init(context, blockCanaryContext);
setEnabled(context, DisplayActivity.class, BlockCanaryContext.get().displayNotification());
return get();
}
/**
* Get {@link BlockCanary} singleton.
*
* @return {@link BlockCanary} instance
*/
public static BlockCanary get() {
if (sInstance == null) {
synchronized (BlockCanary.class) {
if (sInstance == null) {
sInstance = new BlockCanary();
}
}
}
return sInstance;
}
/**
* Start monitoring.
*/
public void start() {
if (!mMonitorStarted) {
mMonitorStarted = true;
Looper.getMainLooper().setMessageLogging(mBlockCanaryCore.monitor);
}
}
其中BlockCanaryInternals类中monitor变量的类型是LooperMonitor类,该类实现了Printer接口,从原理部分我们知道如果我们使用Looper.getMainLooper().setMessageLogging()方法设置了打印日志的监听之后,主线程中所有的事件都会调用此方法:
LooperMonitor.java1
2
3
4
5
6
7
8
9
10
11
12
13
14
15
16
17
18
19@Override
public void println(String x) {
if (mStopWhenDebugging && Debug.isDebuggerConnected()) {
return;
}
if (!mPrintingStarted) {
mStartTimestamp = System.currentTimeMillis();
mStartThreadTimestamp = SystemClock.currentThreadTimeMillis();
mPrintingStarted = true;
startDump();
} else {
final long endTime = System.currentTimeMillis();
mPrintingStarted = false;
if (isBlock(endTime)) {
notifyBlockEvent(endTime);
}
stopDump();
}
}
当事件开始会调用startDump方法开始采样,获取堆栈信息和CPU信息,事件结束会判断是否超过指定阻塞时间值,如果超过会在HandlerThreadFactory提供的HandlerThread子线程中通过接口回调到BlockCanaryInternals类中,该接口通过LooperMonitor构造方法传入,然后调用stopDump方法停止采样。
LooperMonitor.java1
2
3
4
5
6
7
8
9
10
11
12
13
14
15
16
17
18
19
20
21
22
23
24
25
26
27
28
29
30
31
32
33
34
35
36
37
38
39
40
41
42
43
44
45
46
47
48
49private BlockListener mBlockListener = null;
public interface BlockListener {
void onBlockEvent(long realStartTime,
long realTimeEnd,
long threadTimeStart,
long threadTimeEnd);
}
public LooperMonitor(BlockListener blockListener, long blockThresholdMillis, boolean stopWhenDebugging) {
if (blockListener == null) {
throw new IllegalArgumentException("blockListener should not be null.");
}
mBlockListener = blockListener;
mBlockThresholdMillis = blockThresholdMillis;
mStopWhenDebugging = stopWhenDebugging;
}
private void notifyBlockEvent(final long endTime) {
final long startTime = mStartTimestamp;
final long startThreadTime = mStartThreadTimestamp;
final long endThreadTime = SystemClock.currentThreadTimeMillis();
HandlerThreadFactory.getWriteLogThreadHandler().post(new Runnable() {
@Override
public void run() {
mBlockListener.onBlockEvent(startTime, endTime, startThreadTime, endThreadTime);
}
});
}
private void startDump() {
if (null != BlockCanaryInternals.getInstance().stackSampler) {
BlockCanaryInternals.getInstance().stackSampler.start();
}
if (null != BlockCanaryInternals.getInstance().cpuSampler) {
BlockCanaryInternals.getInstance().cpuSampler.start();
}
}
private void stopDump() {
if (null != BlockCanaryInternals.getInstance().stackSampler) {
BlockCanaryInternals.getInstance().stackSampler.stop();
}
if (null != BlockCanaryInternals.getInstance().cpuSampler) {
BlockCanaryInternals.getInstance().cpuSampler.stop();
}
}
接下来我们看下AbstractSampler抽象类,CpuSampler和StackSampler继承自该类,该类中主要处理了start和stop方法,以及一个Runnable调用抽象方法doSample,runnable会在HandlerThreadFactory类中提供的HandleThread子线程中执行。
AbstractSampler.java1
2
3
4
5
6
7
8
9
10
11
12
13
14
15
16
17
18
19
20
21
22
23
24
25
26
27
28
29
30
31
32
33
34private Runnable mRunnable = new Runnable() {
@Override
public void run() {
doSample();
if (mShouldSample.get()) {
HandlerThreadFactory.getTimerThreadHandler()
.postDelayed(mRunnable, mSampleInterval);
}
}
};
...
public void start() {
if (mShouldSample.get()) {
return;
}
mShouldSample.set(true);
HandlerThreadFactory.getTimerThreadHandler().removeCallbacks(mRunnable);
HandlerThreadFactory.getTimerThreadHandler().postDelayed(mRunnable,
BlockCanaryInternals.getInstance().getSampleDelay());
}
public void stop() {
if (!mShouldSample.get()) {
return;
}
mShouldSample.set(false);
HandlerThreadFactory.getTimerThreadHandler().removeCallbacks(mRunnable);
}
abstract void doSample();
StackSampler类中通过mCurrentThread.getStackTrace()获取堆栈信息,存储到sStackMap静态变量中。
StackSampler.java1
2
3
4
5
6
7
8
9
10
11
12
13
14
15
16
17
18
19private static final LinkedHashMap<Long, String> sStackMap = new LinkedHashMap<>();
@Override
protected void doSample() {
StringBuilder stringBuilder = new StringBuilder();
for (StackTraceElement stackTraceElement : mCurrentThread.getStackTrace()) {
stringBuilder
.append(stackTraceElement.toString())
.append(BlockInfo.SEPARATOR);
}
synchronized (sStackMap) {
if (sStackMap.size() == mMaxEntryCount && mMaxEntryCount > 0) {
sStackMap.remove(sStackMap.keySet().iterator().next());
}
sStackMap.put(System.currentTimeMillis(), stringBuilder.toString());
}
}
CpuSampler类中对CPU进行采样,并将CPU信息存储到mCpuInfoEntries变量中:
CpuSampler.java1
2
3
4
5
6
7
8
9
10
11
12
13
14
15
16
17
18
19
20
21
22
23
24
25
26
27
28
29
30
31
32
33
34
35
36
37
38
39
40
41
42
43
44
45
46
47
48
49
50
51
52
53
54
55
56
57
58
59
60
61
62
63
64
65
66
67
68
69
70
71
72
73
74
75
76
77
78
79
80
81
82
83
84
85
86
87
88
89
90
91
92
93
94
95
96
97
98
99
100
101
102
103
104
105
106private final LinkedHashMap<Long, String> mCpuInfoEntries = new LinkedHashMap<>();
@Override
protected void doSample() {
BufferedReader cpuReader = null;
BufferedReader pidReader = null;
try {
cpuReader = new BufferedReader(new InputStreamReader(
new FileInputStream("/proc/stat")), BUFFER_SIZE);
String cpuRate = cpuReader.readLine();
if (cpuRate == null) {
cpuRate = "";
}
if (mPid == 0) {
mPid = android.os.Process.myPid();
}
pidReader = new BufferedReader(new InputStreamReader(
new FileInputStream("/proc/" + mPid + "/stat")), BUFFER_SIZE);
String pidCpuRate = pidReader.readLine();
if (pidCpuRate == null) {
pidCpuRate = "";
}
parse(cpuRate, pidCpuRate);
} catch (Throwable throwable) {
Log.e(TAG, "doSample: ", throwable);
} finally {
try {
if (cpuReader != null) {
cpuReader.close();
}
if (pidReader != null) {
pidReader.close();
}
} catch (IOException exception) {
Log.e(TAG, "doSample: ", exception);
}
}
}
private void parse(String cpuRate, String pidCpuRate) {
String[] cpuInfoArray = cpuRate.split(" ");
if (cpuInfoArray.length < 9) {
return;
}
long user = Long.parseLong(cpuInfoArray[2]);
long nice = Long.parseLong(cpuInfoArray[3]);
long system = Long.parseLong(cpuInfoArray[4]);
long idle = Long.parseLong(cpuInfoArray[5]);
long ioWait = Long.parseLong(cpuInfoArray[6]);
long total = user + nice + system + idle + ioWait
+ Long.parseLong(cpuInfoArray[7])
+ Long.parseLong(cpuInfoArray[8]);
String[] pidCpuInfoList = pidCpuRate.split(" ");
if (pidCpuInfoList.length < 17) {
return;
}
long appCpuTime = Long.parseLong(pidCpuInfoList[13])
+ Long.parseLong(pidCpuInfoList[14])
+ Long.parseLong(pidCpuInfoList[15])
+ Long.parseLong(pidCpuInfoList[16]);
if (mTotalLast != 0) {
StringBuilder stringBuilder = new StringBuilder();
long idleTime = idle - mIdleLast;
long totalTime = total - mTotalLast;
stringBuilder
.append("cpu:")
.append((totalTime - idleTime) * 100L / totalTime)
.append("% ")
.append("app:")
.append((appCpuTime - mAppCpuTimeLast) * 100L / totalTime)
.append("% ")
.append("[")
.append("user:").append((user - mUserLast) * 100L / totalTime)
.append("% ")
.append("system:").append((system - mSystemLast) * 100L / totalTime)
.append("% ")
.append("ioWait:").append((ioWait - mIoWaitLast) * 100L / totalTime)
.append("% ]");
synchronized (mCpuInfoEntries) {
mCpuInfoEntries.put(System.currentTimeMillis(), stringBuilder.toString());
if (mCpuInfoEntries.size() > MAX_ENTRY_COUNT) {
for (Map.Entry<Long, String> entry : mCpuInfoEntries.entrySet()) {
Long key = entry.getKey();
mCpuInfoEntries.remove(key);
break;
}
}
}
}
mUserLast = user;
mSystemLast = system;
mIdleLast = idle;
mIoWaitLast = ioWait;
mTotalLast = total;
mAppCpuTimeLast = appCpuTime;
}
接下来回到BlockCanaryInternals类看下阻塞事件发生时的处理:
BlockCanaryInternals.java1
2
3
4
5
6
7
8
9
10
11
12
13
14
15
16
17
18
19
20
21
22
23
24
25
26
27
28
29
30
31
32
33
34
35
36public BlockCanaryInternals() {
stackSampler = new StackSampler(
Looper.getMainLooper().getThread(),
sContext.provideDumpInterval());
cpuSampler = new CpuSampler(sContext.provideDumpInterval());
setMonitor(new LooperMonitor(new LooperMonitor.BlockListener() {
@Override
public void onBlockEvent(long realTimeStart, long realTimeEnd,
long threadTimeStart, long threadTimeEnd) {
// Get recent thread-stack entries and cpu usage
ArrayList<String> threadStackEntries = stackSampler
.getThreadStackEntries(realTimeStart, realTimeEnd);
if (!threadStackEntries.isEmpty()) {
BlockInfo blockInfo = BlockInfo.newInstance()
.setMainThreadTimeCost(realTimeStart, realTimeEnd, threadTimeStart, threadTimeEnd)
.setCpuBusyFlag(cpuSampler.isCpuBusy(realTimeStart, realTimeEnd))
.setRecentCpuRate(cpuSampler.getCpuRateInfo())
.setThreadStackEntries(threadStackEntries)
.flushString();
LogWriter.save(blockInfo.toString());
if (mInterceptorChain.size() != 0) {
for (BlockInterceptor interceptor : mInterceptorChain) {
interceptor.onBlock(getContext().provideContext(), blockInfo);
}
}
}
}
}, getContext().provideBlockThreshold(), getContext().stopWhenDebugging()));
LogWriter.cleanObsolete();
}
先从堆栈采样类中获取阻塞时间期间的堆栈信息:
StackSampler.java1
2
3
4
5
6
7
8
9
10
11
12
13
14public ArrayList<String> getThreadStackEntries(long startTime, long endTime) {
ArrayList<String> result = new ArrayList<>();
synchronized (sStackMap) {
for (Long entryTime : sStackMap.keySet()) {
if (startTime < entryTime && entryTime < endTime) {
result.add(BlockInfo.TIME_FORMATTER.format(entryTime)
+ BlockInfo.SEPARATOR
+ BlockInfo.SEPARATOR
+ sStackMap.get(entryTime));
}
}
}
return result;
}
然后创建BlockInfo存储到本地文件中,如果设置了阻塞监听,会逐一回调给监听者。如果我们设置了显示通知,会回调给DisplayService类处理通知的显示。
判断CPU是否比较busy的值为采样时间间隔的1.2倍,如果两次采样时间间隔大于采样时间间隔的1.2倍,则认为CPU当前是busy的。
CpuSampler.java1
2
3
4
5
6
7
8
9
10
11
12
13
14
15
16
17
18
19
20
21
22
23
24public CpuSampler(long sampleInterval) {
super(sampleInterval);
BUSY_TIME = (int) (mSampleInterval * 1.2f);
}
public boolean isCpuBusy(long start, long end) {
if (end - start > mSampleInterval) {
long s = start - mSampleInterval;
long e = start + mSampleInterval;
long last = 0;
synchronized (mCpuInfoEntries) {
for (Map.Entry<Long, String> entry : mCpuInfoEntries.entrySet()) {
long time = entry.getKey();
if (s < time && time < e) {
if (last != 0 && time - last > BUSY_TIME) {
return true;
}
last = time;
}
}
}
}
return false;
}
至此,BlockCanary中的关键源码处理流程我们就分析完了,剩下的就是blockcanary-android模块中的通知及相关页面的处理,感兴趣的同学请自行了解。
参考
- http://blog.zhaiyifan.cn/2016/01/16/BlockCanaryTransparentPerformanceMonitor/
- https://github.com/markzhai/AndroidPerformanceMonitor

