本文介绍了App Toolbar的使用。
概述
Toolbar是在Android 5.0引入,API 21发布并且是ActionBar的精神继承者。它是一个ViewGroup可以放在XML布局中的任何地方。Toolbar的外表和行为比ActionBar更容易定制。

Toolbar可以API 21及以上完美运行。但是,Android更新了AppCompat support libraries ,因此Toolbar也可以运行在低版本。在AppCompat中,Toolbar是通过android.support.v7.widget.Toolbar类实现的。
这有两种方法使用Toolbar:
1.当你想使用已存在的ActionBar设施(例如菜单和选择,ActionBarDrawerToggle等等)但想更多控制它的外观时,使用Toolbar作为ActionBar。
2.你的应用不会支持ActionBar时使用一个独立的Toolbar。例如,在屏幕上显示多个toolbars,只占宽度的一部分等等。
Toolbar vs ActionBar
Toolbar概括了ActionBar系统。Toolbar和ActionBar的关键区别包括:
Toolbar是包含在布局中的一个View就像其它View一样- 作为一个普通
View,toolbar很方便摆放,动画和控制 - 多个不同的
Toolbar元素可以定义在一个activity
注意你也可以配置Toolbar作为Activity的ActionBar,就是说标准的选项菜单动作也会显示。
注意ActionBar会继续起作用,如果你需要一个静态条在顶部可以显示图标和一个返回按钮,那你可以继续使用ActionBar。
使用Toolbar作为ActionBar
为了使用Toolbar作为ActionBar,首先需要在(Module:app)build.gradle文件中添加AppCompat-v7 support library依赖:1
2
3
4dependencies {
...
compile 'com.android.support:appcompat-v7:25.2.0'
}
然后,禁用主题提供的ActionBar。最简单的方法是在res/styles.xml文件中修改应用的主题继承Theme.AppCompat.NoActionBar(或其它Light主题):
1 | <resources> |
现在需要在Activity布局文件中添加一个Toolbar。使用Toolbar最大的好处之一就是你可以把View放到布局中的任何地方。下面我们把toolbar放到LinearLayout的上面像标准的ActionBar一样:1
2
3
4
5
6
7
8
9
10
11
12
13
14
15
16
17
18
19<LinearLayout xmlns:android="http://schemas.android.com/apk/res/android"
xmlns:app="http://schemas.android.com/apk/res-auto"
android:layout_width="match_parent"
android:layout_height="match_parent"
android:fitsSystemWindows="true"
android:orientation="vertical">
<android.support.v7.widget.Toolbar
android:id="@+id/toolbar"
android:minHeight="?attr/actionBarSize"
android:layout_width="match_parent"
android:layout_height="wrap_content"
app:titleTextColor="@android:color/white"
android:background="?attr/colorPrimary">
</android.support.v7.widget.Toolbar>
<!-- Layout for content is here. This can be a RelativeLayout -->
</LinearLayout>
注意:你需要在Toolbar的父布局添加android:fitsSystemWindows="true"(了解更多)来确保Activity的高度被正确计算。
正如Toolbar只是一个ViewGroup并且可以 像其它View一样样式化和摆放位置。注意这意味着在RelativeLayout中时,需要确保其它View放在toolbar下面。Toolbar作为一个View不会有任何特殊的对待。
然后,在Activity或Fragment中,通过调用setSupportActionBar(Toolbar)方法设置Toolbar作为ActionBar:
注意:当你使用support library时,确保导入的类为android.support.v7.widget.Toolbar而不是android.widget.Toolbar。
1 | import android.support.v7.app.AppCompatActivity; |
然后,我们需要确保在onCreateOptionsMenu中填充的菜单资源例如res/menu/menu_main.xml中列出action items:1
2
3
4
5
6
7
8
9
10
11
12
13
14
15<menu xmlns:android="http://schemas.android.com/apk/res/android"
xmlns:app="http://schemas.android.com/apk/res-auto">
<item
android:id="@+id/miCompose"
android:icon="@drawable/ic_compose"
app:showAsAction="ifRoom"
android:title="Compose">
</item>
<item
android:id="@+id/miProfile"
android:icon="@drawable/ic_profile"
app:showAsAction="ifRoom|withText"
android:title="Profile">
</item>
</menu>
关于Toolbar中action items包括怎样配置点击处理,参考我们的ActionBar使用指南。上面的代码会导致toolbar在顶部会完全替换ActionBar:

这样来看,所有的菜单选项都会显示在Toolbar,通过标准的菜单选项回调填充。
重用Toolbar
在很多应用中,同样的toolbar会被多个activity使用或在同一个activity中是可替代的布局资源。为了简单地重用toolbar,我们可以使用如下布局include标签。首先在布局文件res/layout/toolbar_main.xml中定义toolbar:1
2
3
4
5
6<android.support.v7.widget.Toolbar
xmlns:android="http://schemas.android.com/apk/res/android"
android:id="@+id/toolbar"
android:layout_width="match_parent"
android:layout_height="wrap_content"
android:background="?attr/colorPrimary"/>
然后,我们使用<include />标签引入toolbar到activity布局文件中:1
2
3
4
5
6
7
8
9
10
11
12
13
14
15
16
17<LinearLayout
xmlns:android="http://schemas.android.com/apk/res/android"
xmlns:tools="http://schemas.android.com/tools"
android:layout_width="match_parent"
android:layout_height="match_parent"
android:fitsSystemWindows="true"
android:orientation="vertical">
<!-- Load the toolbar here -->
<include
layout="@layout/toolbar_main"
android:layout_width="match_parent"
android:layout_height="wrap_content"/>
<!-- Rest of content for the activity -->
</LinearLayout>
这可以让我们创建导航体验一致的应用或统一修改配置。
Toolbar的样式
有很多方法可以自定义Toolbar利用不同的样式属性包括android:theme,app:titleTextAppearance,app:popupTheme。这些可以对应成一个样式。1
2
3
4
5
6
7
8
9
10<android.support.v7.widget.Toolbar
android:id="@+id/toolbar"
android:layout_width="match_parent"
android:layout_height="wrap_content"
android:minHeight="?attr/actionBarSize"
android:background="?attr/colorPrimary"
android:theme="@style/ToolbarTheme"
app:titleTextAppearance="@style/Toolbar.TitleText"
app:popupTheme="@style/ThemeOverlay.AppCompat.Light"
/>
然后我们需要在res/styles.xml中创建自定义样式:1
2
3
4
5
6
7
8
9
10
11
12
13
14
15
16
17
18
19
20
21
22
23
24
25
26
27
28
29
30
31
32
33
34<!-- Base application theme. -->
<style name="AppTheme" parent="Theme.AppCompat.Light.NoActionBar">
<!-- Customize your theme here. -->
<item name="colorPrimary">@color/colorPrimary</item>
<item name="colorPrimaryDark">@color/colorPrimaryDark</item>
<item name="colorAccent">@color/colorAccent</item>
</style>
<style name="ToolbarTheme" parent="@style/ThemeOverlay.AppCompat.Dark.ActionBar">
<!-- android:textColorPrimary is the color of the title text in the Toolbar -->
<item name="android:textColorPrimary">@android:color/holo_blue_light</item>
<!-- actionMenuTextColor is the color of the text of action (menu) items -->
<item name="actionMenuTextColor">@android:color/holo_green_light</item>
<!-- Tints the input fields like checkboxes and text fields -->
<item name="colorAccent">@color/cursorAccent</item>
<!-- Applies to views in their normal state. -->
<item name="colorControlNormal">@color/controlNormal</item>
<!-- Applies to views in their activated state (i.e checked or switches) -->
<item name="colorControlActivated">@color/controlActivated</item>
<!-- Applied to framework control highlights (i.e ripples or list selectors) -->
<item name="colorControlHighlight">@color/controlActivated</item>
<!-- Enable these below if you want clicking icons to trigger a ripple effect -->
<!--
<item name="selectableItemBackground">?android:selectableItemBackground</item>
<item name="selectableItemBackgroundBorderless">?android:selectableItemBackground</item>
-->
</style>
<!-- This configures the styles for the title within the Toolbar -->
<style name="Toolbar.TitleText" parent="TextAppearance.Widget.AppCompat.Toolbar.Title">
<item name="android:textSize">21sp</item>
<item name="android:textStyle">italic</item>
</style>
结果为:

显示应用图标
在某些情况下,我们可以想要在Toolbar上显示一个应用图标。我们可以通过在Activity中添加如下代码完成:1
2
3
4
5
6
7
8// Find the toolbar view and set as ActionBar
Toolbar toolbar = (Toolbar) findViewById(R.id.toolbar);
setSupportActionBar(toolbar);
// ...
// Display icon in the toolbar
getSupportActionBar().setDisplayShowHomeEnabled(true);
getSupportActionBar().setLogo(R.mipmap.ic_launcher);
getSupportActionBar().setDisplayUseLogoEnabled(true);
然后,我们需要把左边的margin移除通过在Toolbar添加app:contentInsetStart,不然图标离左边太远。1
2
3
4
5
6
7<android.support.v7.widget.Toolbar
android:id="@+id/toolbar"
app:contentInsetLeft="0dp"
app:contentInsetStart="0dp"
...
>
</android.support.v7.widget.Toolbar>
图标应该会合适地显示在Toolbar上。
自定义Title View
Toolbar只是一个装饰的ViewGroup,被包含的title可以完全被自定义通过在Toolbar中嵌入一个View例如:1
2
3
4
5
6
7
8
9
10
11
12
13
14
15
16
17
18
19<android.support.v7.widget.Toolbar
android:id="@+id/toolbar"
android:minHeight="?attr/actionBarSize"
android:layout_width="match_parent"
android:layout_height="wrap_content"
app:titleTextColor="@android:color/white"
android:background="?attr/colorPrimary">
<TextView
android:id="@+id/toolbar_title"
android:layout_width="wrap_content"
android:layout_height="wrap_content"
android:text="Toolbar Title"
android:textColor="@android:color/white"
style="@style/TextAppearance.AppCompat.Widget.ActionBar.Title"
android:layout_gravity="center"
/>
</android.support.v7.widget.Toolbar>
这意味着你可以定义TextView的样式像其它View一样。你可以在activity中访问TextView:1
2
3
4
5
6
7
8/* Inside the activity */
// Sets the Toolbar to act as the ActionBar for this Activity window.
Toolbar toolbar = (Toolbar) findViewById(R.id.toolbar);
setSupportActionBar(toolbar);
// Remove default title text
getSupportActionBar().setDisplayShowTitleEnabled(false);
// Get access to the custom title view
TextView mTitle = (TextView) toolbar.findViewById(R.id.toolbar_title);
注意你必须 使用setDisplayShowTitleEnabled隐藏默认的title。结果是:

半透明状态条
某些情况下,状态条是半透明的例如:

为了实现这个效果,首先在res/values/styles.xml文件中给主题设置这些属性:1
2
3
4
5<item name="android:statusBarColor">@android:color/transparent</item>
<item name="android:navigationBarColor">@android:color/transparent</item>
<item name="android:windowTranslucentStatus">true</item>
<item name="android:windowTranslucentNavigation">true</item>
<item name="android:windowDrawsSystemBarBackgrounds">true</item>
在activity的根布局设置fitsSystemWindows属性将会得到透明的状态条:1
2
3
4<RelativeLayout
android:fitsSystemWindows="true"
...
>
这样就设置好了。更多细节请参考this stackoverflow post。
透明状态条
如果你想让Android 4.4及以上的状态条完全透明,方法很简单:1
2
3
4if (Build.VERSION.SDK_INT >= Build.VERSION_CODES.KITKAT) {
Window w = getWindow(); // in Activity's onCreate() for instance
w.setFlags(WindowManager.LayoutParams.FLAG_LAYOUT_NO_LIMITS, WindowManager.LayoutParams.FLAG_LAYOUT_NO_LIMITS);
}
然后在res/values/styles.xml文件中添加这个样式到主题上:1
<item name="android:windowDrawsSystemBarBackgrounds">true</item>
这样就设置好了。更多细节请参考this stackoverflow post。
响应滚动
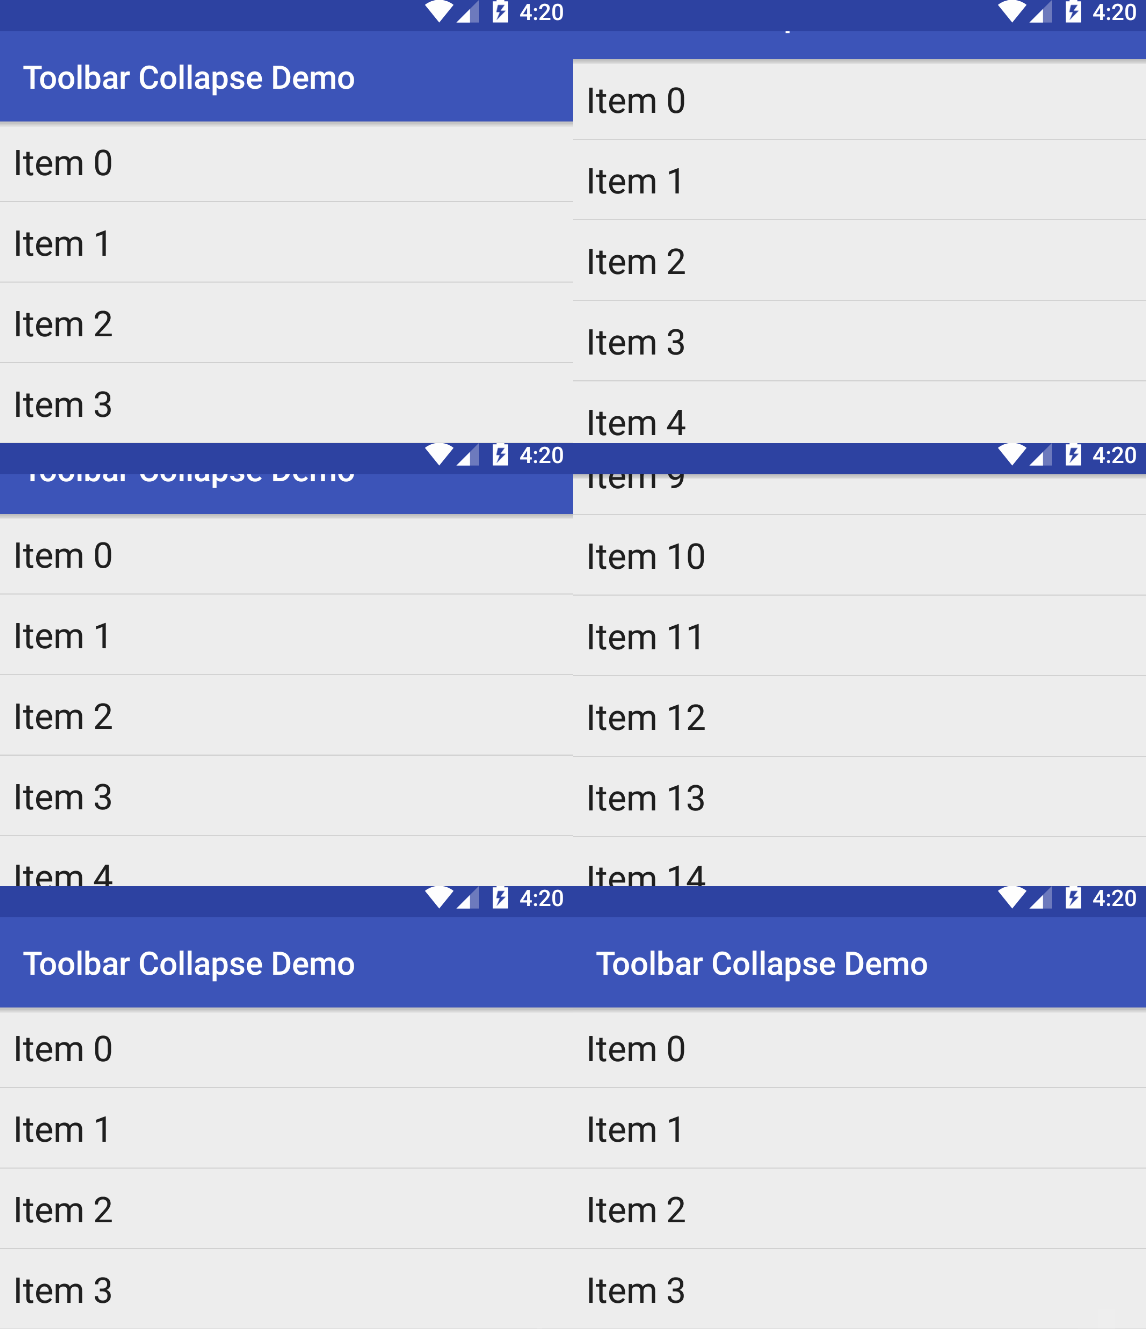
我们可以配置Toolbar响应和随着页面滚动:

例如,当用户在一个列表上向下滚动时我们可以隐藏toolbar或用户滚动到header时展开。通过使用CoordinatorLayout可以配置很多效果。首先我们需要确保在app/build.gradle文件中添加了design support library:1
2
3
4
5
6dependencies {
// ...
compile 'com.android.support:appcompat-v7:23.1.0'
compile 'com.android.support:recyclerview-v7:23.1.0'
compile 'com.android.support:design:23.1.0'
}
然后,在activity的布局文件例如res/layout/activity_main.xml,我们需要配置coordinated layout和Toolbar和一个滚动容器例如RecyclerView:
1 | <!-- CoordinatorLayout is used to create scrolling and "floating" effects within a layout --> |
当然了,RecyclerView也可以使用加载fragment的FrameLayout替换:1
2
3
4
5
6
7
8
9
10
11
12
13
14
15
16
17
18
19<android.support.design.widget.CoordinatorLayout
android:id="@+id/main_content"
xmlns:android="http://schemas.android.com/apk/res/android"
xmlns:app="http://schemas.android.com/apk/res-auto"
android:layout_width="match_parent"
android:layout_height="match_parent">
<!-- AppBarLayout and Toolbar as outlined in previous snippet! -->
<!-- FrameLayout can be used to insert fragments to display the content of the screen -->
<!-- `app:layout_behavior` is set to a pre-defined behavior for scrolling -->
<FrameLayout
android:id="@+id/content"
android:layout_width="match_parent"
android:layout_height="match_parent"
app:layout_behavior="@string/appbar_scrolling_view_behavior"
/>
</android.support.design.widget.CoordinatorLayout>
这个布局的结果如下所示:

额外的详情和说明请查看CoordinatorLayout使用指南。常见问题请参考常见问题提示。
Toolbar的高级滚动行为
对于滚动行为适当的响应方式是利用Design Support Library中的CoordinatorLayout就像前面的讲到的部分。这有几个手动响应滚动事件方法相关的资源:
- Hiding or Showing Toolbar on Scroll——对于不需要
CoordinatorLayout实现”Google Play Music”应用的behavior上是非常好的指导,示例代码可以从这里找到。 - Hiding or Showing Toolbar using CoordinatorLayout——概述了当用户滚动时怎样使用
CoordinatorLayout隐藏Toolbar和FAB。
使用这些方法,可以实现上面方法所没提到的常见应用的不同程度难度的滚动行为。

